Svelte.js 3 Context API Tutorial
In this tutorial we learn how to use a simple state management solution in Svelte called the Context API.
We cover how to avoid prop drilling by making data available to components directly.
Lesson Video
If you prefer to learn visually, you can watch this lesson in video format.
Lesson Project
If you want to follow along with the examples in this lesson, you’ll need a Svelte app that was cloned with degit or scaffolded with Vite
If you already have an app from previous lessons, you can use that instead.
What is the Context API in Svelte?
The Context API provides us with a way to pass data down through the component tree without going through each level with props (prop drilling). It can be used as a simple state management solution.
As an example, let’s consider the following application structure.

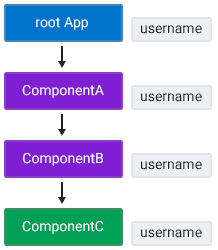
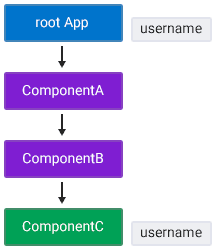
Our component tree consists of four components, each nested inside its parent up to the root App component.
Imagine that the root App component contains a username that we want to use in ComponentC.
Typically, the username would have to be passed down through components A and B to be available in ComponentC.
We can bypass the whole chain by making the prop available in the root app component, then accessing it directly in ComponentC.

How to make data available directly to another component with 'setContext' in Svelte
To make data available to another component directly, we use the setContext special Svelte function, imported from the ‘svelte’ package.
This function requires 2 arguments.
- A context key that identifies the data we want to retrieve later on.
- A context value is the actual data we want to make available.
<script>
  import { setContext } from 'svelte'

  setContext('key', 'value')
</script>
<script>
  import { setContext } from 'svelte'

  setContext('username', 'John')
</script>
That’s all we need to make data available to another component.
How to retrieve Context data with 'getContext' in Svelte
We can use the getContext function from the ‘svelte’ package to retrieve context data.
This function takes one argument and stores the context data.
- The context key that was used in the setContext method.
<script>
  import { getContext } from 'svelte'

  const contextValue = getContext('key')
</script>
For our example, let’s add the following components.
- /src/components/Child.svelte
- /src/components/Grandchild.svelte
The project should look similar to the following.
project-folder/
├── src/
|   ├── components/
|   |   ├── Child.svelte
|   |   └── Grandchild.svelte
|   └── App.svelte
The root App component will import and use the Child component.
<script>
  import { setContext } from 'svelte'
  import Child from './components/Child.svelte'

  setContext('username', 'John')
</script>

<Child />
The Child component will import and use the Grandchild component.
<script>
  import Grandchild from './Grandchild.svelte'
</script>

<Grandchild />
The Grandchild component is where we’ll access the username that we set in the root App component.
<script>
  import { getContext } from 'svelte'

  const username = getContext('username')
</script>

<h2><code>Grandchild.svelte</code></h2>
<p>Username: { username }</p>
If we save the files and take a look in the browser, we’ll see the username rendered on the page.
We didn’t have to pass the data through the Child component, we could access it directly in the Grandchild .